OSRS Dragon Slayer 2 Quest Guide


Dragon Slayer II Quest Guide OSRS
Does VIRTGOLD offer Powerleveling Services for me?
Yes! In fact, our team of expert Powerlevelers has mastered every inch of efficient OSRS training methods, and we're ready to help you accomplish the same feat. Whether you're a seasoned adventurer or just starting out, our personalized approach ensures that you'll receive the most affordable prices and most skilled workers to come out on top. So why wait? Take on the grind of OSRS with confidence, thanks to VIRTGOLD. Want to skip the grind all together? Consider our other services such as Currency and Questing!

Details
Requirements:
200 Quest points
75 Magic (not boostable)
70 Smithing (not boostable)
68 Mining (not boostable)
62 Crafting (not boostable)
60 Agility (not boostable) (higher recommended)
60 Thieving (not boostable)
50 Construction (not boostable)
50 Hitpoints (not boostable)
Completion of the Following Quests
Legends' Quest
Family Crest
Heroes' Quest
Shield of Arrav
Lost City
Merlin's Crystal
Dragon Slayer I
Underground Pass
Biohazard
Plague City
Waterfall Quest
Dream Mentor
Lunar Diplomacy
The Fremennik Trials
Rune Mysteries
Shilo Village
Jungle Potion
Eadgar's Ruse
Druidic Ritual
Troll Stronghold
Death Plateau
A Tail of Two Cats
Icthlarin's Little Helper
Gertrude's Cat
Animal Magnetism
Ernest the Chicken
Priest in Peril
The Restless Ghost
Ghosts Ahoy
Bone Voyage
The Dig Site
100 Kudos
Client of Kourend
X Marks the Spot
Started the Firemaking part of Barbarian Training to gain access to the Ancient Cavern
Items Required:
A pickaxe
An axe
8 oak planks
10 swamp paste
At least 12 nails of any kind (Note: Bringing more is recommended; nails may bend!)
A hammer
A machete
A saw
Catspeak amulet
Ghostspeak amulet (Morytania Legs 2+ work)
Goutweed
Cut dragonstone
2 molten glass
Glassblowing pipe
Chisel
Spade
Astral rune
Seal of passage (or elite Fremennik Diary completion)
Tinderbox
Pestle and mortar
Runes for 3 Fire Wave spells or 3 Fire Surge spells
Recommended:
100 Combat level (75+ range recommended)
Prayer level to use at least protection prayers.
Stamina potions
Serpentine helm or anti-venom+
Teleports to various places around the game, most notably Musa Point, Fossil Island, Lunar Isle, and Rellekka as well as access to Spirit trees and Glider transport.
High-tier combat equipment, high-healing food, and prayer potions


Ok, Let’s do This!
Speak to Alec Kincade outside the Myths' Guild

Begin the quest by conversing with Alec Kincade outside Myths' Guild (Chat 2•1).
Proceed to Karamja pub at Musa Point, engage Dallas Jones in conversation (Chat 2).
Journey to Elvarg's Lair beneath Crandor. Speak to Dallas Jones; use the volcano shortcut on Karamja.
In Elvarg's Lair, wield your pickaxe on the Northern wall post-Elvarg battle. Enter the tunnel marked red on the minimap.
Examine the Ancient Mural up north, prompting a level 100 spawn. Defeat it.
Reinspect the mural.
Converse with Dallas Jones to progress.
"The House on the Hill" Quest Steps:
1. Head to Fossil Island, reach the House on the Hill's basement, and speak to Dallas Jones (Chat 1).
2. Gather 24 missing map pieces and utilize them on the central room map. Optionally, hand 8 pieces to Dallas indoors for inventory space.
3. Search the open chest north of the map for 5 pieces.
4. Proceed upstairs, explore the open stone chest on the north wall for 3 pieces.
5. Outside, locate the Fungi just north of the staircase for 4 pieces.
6. Search the Hook briar south of the house for 7 pieces.
7. Move east, search the mushtree for 5 pieces.
8. Engage Dallas Jones and solve the map puzzle (Chat 1•1). Rotate or drag pieces to align them.
9. Converse with Dallas Jones again.
10. Finally, talk to Jardric at the museum camp.

"To Lithkren!" Expedition:
1. On the west side of the island (southwest of the "Mushroom Meadow" Magic Mushtree), carry 8 oak planks, 10 swamp paste, 12 nails (bring extras), a hammer, and a saw. Construct a rowboat.
2. Speak with Dallas Jones, then board the boat (Chat 1).
3. Venture northwest to the ruined courtyard from the boat. Ascend the western stairs.
4. Descend through the southern trapdoor, then the northern staircase, and further down another staircase to the north.
5. Engage in conversation with Dallas Jones.
6. Investigate the eastern skeleton and read Aivas' diary.
7. Reconnect with Dallas Jones for further dialogue.
Bob the Cat Encounter:
1. Locate Bob the Cat by employing your Catspeak amulet (e), then engage in conversation with him. (Quick access: anvils in west Varrock, hop worlds).
2. Speak to the Sphinx in Sophanem. (Chat 1).
3. Undergo an enchantment by the Sphinx. You can now communicate with cats without the need for a Catspeak amulet!
Robert the Strong Confrontation:
1. Carry your seal of passage and ensure one free inventory space. Note: While the seal is not essential for accessing 'Bird's-Eye' Jack's bank, it's required for dialogue with the Oneiromancer.
2. Travel to Lunar Isle, engage with the Oneiromancer. (Chat 3•1).
3. Crush an astral rune with a hammer and grind the shards using a pestle and mortar.
4. Forge a dream potion: fill the dream vial with water (west of the bank), then add goutweed and ground astral rune.
5. Equip for battle, light the Ceremonial Brazier (largest building), and use the Dream potion on the flame.
6. To prepare, use the giant history book at the entrance. Rejoin by speaking to Bob. Engage with Bob and Not Bob, then exit to gear up and resupply.
7. Return to the dream via Bob, proceed through the barrier, and defeat Robert the Strong.
8. Use melee gear and a crush weapon. Be cautious with Protect from Missiles as it mitigates but doesn't nullify damage. Employ chivalry or piety for quicker battle progression.
9. When he shouts "See if you can hide from this!" seek cover behind a pillar to dodge his special attack. It deals up to 60 damage and disrupts prayers.
10. Prioritize Super combat potion, ample food, and prayer potions. Approach the fight with utmost caution; it's formidable.
Note: The confrontation unfolds within an instanced zone. Should demise occur, you can reclaim belongings at a nearby chest near the brazier for 100,000 coins. Unclaimed items from an unsafe death will be forfeited.
If you leave the dream, you do NOT have to remake the dream potion! Talk to Bob to re-enter the dream.
The Dragon Key
Karamja key piece:
1. Engage in conversation with Bob again.
2. Obtain the four parts of the key essential for unlocking the Lithkren door.
3. Karamja Key Piece:
3.1. Journey to the Kharazi Jungle's southeastern coast.
3.2. Descend into the maze through the staircase. Disable Auto Retaliate.
3.3. Reach the maze center and acquire the key piece.
3.4. Safelybypass traps with thieving and agility skills.
3.5. Employ protection prayers against golem attacks:
Red:Melee
Green:Ranged
Blue:Magic
3.6. The Dragon key piece activates the plinth for exit transport.

Karamjan Temple entrance.

The route to the centre of the temple's maze. This map is flipped, making the top part south, and bottom part north.
Morytania Key piece:
1. Speak to Reldo in the Varrock Castle library. (Chat 1).
2. Search the second bookcase from the north on the west side of the central row (refer to image).
3. Reconnect with Reldo. (Chat 1).
4. Visit Port Phasmatys and engage Sarah, located west of the bank.
5. Carry a dragonstone, 2 molten glass, a glassblowing pipe, and a chisel to Ava in Draynor Manor. (Chat 3). Use the pipe on the dragonstone and inert locator orb on Ava, receiving a locator orb.
6. In Mort Myre Swamp, employ the locator to locate the buried key piece. Expect damage from the locator; bring food. Directional cues guide your search.
Begin at B.K.R.
North-east points to a solitary purple spot accessible by bridge.
South-west, south, or south-east: Move to area center, scan.
E.g., west → center of blue subdivision → scan → west → single dig spot.
7. Unearth the dragon key piece.
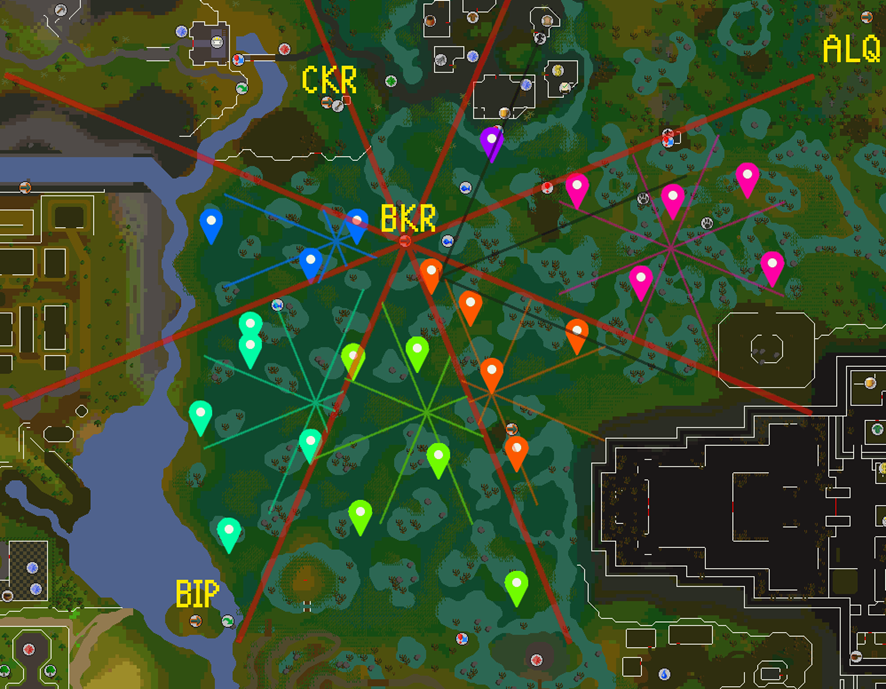
A map of possible key piece locations, which splits Mort Myre Swamp into 6 sections, starting at the B.K.R fairy ring, then further subdivides sections past that.
Ungael key piece:
Vorkath Battle and Dragon Key Retrieval
1. Consult Brundt the Chieftain in Rellekka regarding the dragonkin fortress. Choose appropriate chat option based on your quest progress. (Chat 2), (Chat 3), or (Chat 4).
2. Equip for a showdown with Vorkath. Refer to Vorkath/Strategies for ideal setups.
Super antifire and Anti-venom+ potions are essential.
Set quick prayers: Protect from Magic and optimal ranged attack prayer for easy re-enabling.
Consider Elite Void Knight gear with crossbow and ruby/diamond bolts.
Disable run for evading fire barrage; Ctrl+click tiles for swift movement.
3. Talk to Torfinn on the northern dock for passage to Ungael. (Chat 1).
4. Defeat Vorkath:
4.1. Prior to the fight, activate Protect from Magic and consume Anti-venom+, Super antifire, and Ranging potions.
4.2. Re-potduring the battle due to short potion durations (both 3 minutes).
4.3. Vorkathemploys various attacks, especially watch for:
Orange fireball shot into the air: Move at least two squares away.
Pink fireball shot at you: Reactivate prayers with quick prayers.
5. After six regular attacks, Vorkath uses special moves:
5.1. Acid spit followed by rapid fireballs: Sidestep acid and dodge fireballs on a clear line.
5.2. Dragonfire barrage: Traps you in ice, summoning a Zombified spawn. Defeat it swiftly; Crumble Undead guarantees one-hit kill.
6. Post-Vorkath, traverse ice chunks to the north and proceed northwest to the cave. Enter with Anti-venom+ for venomous spiders.
7. Pull southwest lever, dash to the east room (minimum 15% run energy).
8. Investigate the stone chest for a dragon key piece and an ancient key.
Obtaining the Kourend Key Piece:
1. Enter the crypt situated in the southern portion of the Graveyard of Heroes. Trace the dirt path southward to reach a small building.
2. Exercise caution: The crypt houses formidable aggressive skeletons and zombies with all three combat styles.
3. Descend to the crypt's bottom and examine the tomb to uncover the puzzle.
4. Solving the puzzle varies by individual. Utilize the guide below for puzzle resolution:
4.1. "The one from [Location] sat at the north of the table": Place this statue north.
4.2. "Opposite the one with [Weapon]": Place this statue south.
4.3. "The one with [Weapon] asked the .....": Place this statue west.
4.4. Place the final statue east.
5. Retrieve the Dragon key piece by searching the tomb.


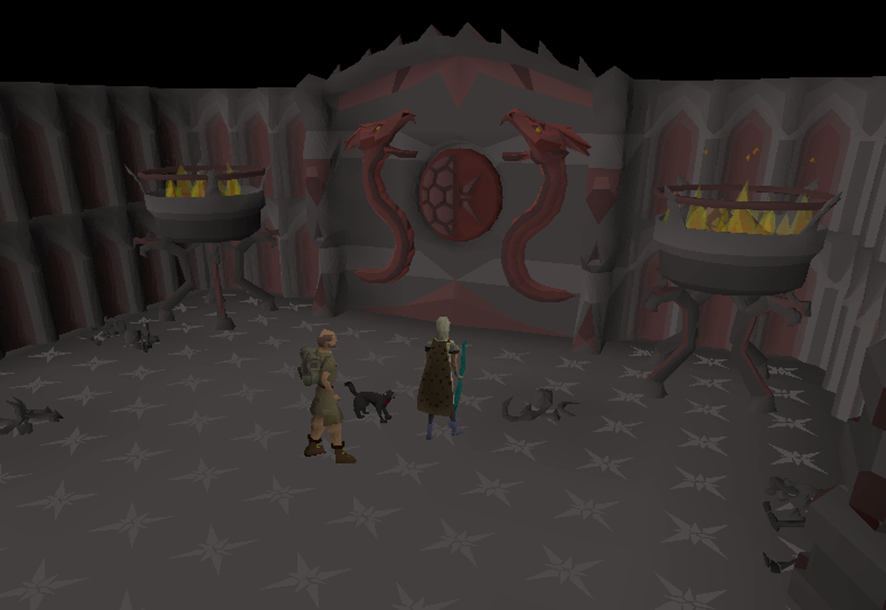
Reforging the Dragon Key:
1. Travel to the Ancient Cavern. Employ a Games Necklace to teleport to Barbarian Outpost and proceed south to the whirlpool.
2. Descend the stairs and head south to another set of stairs leading to the mithril dragon area.
3. Proceed west and unlock the mithril door at the center of the area (between three mithril dragons) using the ancient key.
4. Cast Fire Wave or Fire Surge on the three dragon heads.
5. Exit the room, head east down the staircase, and reach the south-western cavern area. Ascend the rough hewn steps.
6. Use one of the anvils in this location to forge the dragon key.
7. Return to Fossil Island, utilize the Rowboat to reach Lithkren (west of Mushroom Meadow Mushtree). Revisit the area where Dallas Jones is.
8. Employ the Dragon key on the ancient doors.
9. Enter the doors, proceed north, and converse with Dallas to initiate a cutscene.
10. Post-cutscene, conclude dialogue with Jardric and Bob.
A World United Progression
1. Journey to Varrock and converse with King Roald regarding the dragon threat. (Chat 1).
2. Communicate with the following rulers concerning the dragon menace in any sequence:
2.1. Sir Amik Varze in Falador. (Chat 1)
2.2. King Lathas (King Thoros post Song of the Elves) in East Ardougne. (Chat 1)
2.3. Brundt the Chieftain in Rellekka. Choose (Chat 2) or (Chat 3) based on your completion status of The Fremennik Exiles.
3. Return to Varrock and access the dining room north of the throne room. (Chat 1).
4. After exiting the dining room, ensure to engage in conversation with Bob.
The Assault - Defending and Battling:
1. Return to Rellekka, then speak to Torfinn to journey back to Ungael by boat.
2. Defend your ship for 4 minutes during the assault:
2.1. Click on leaks to seal them.
2.2. Click on fires to extinguish them.
2.3. Click on injured Fremennik warriors to heal them.
2.4. Click on damaged masts to repair them.
2.5 Acheckpoint occurs after successfully defending against the assault.
3. Don your dragonfire protection and advance toward Varrock's grand ship. Face red, iron, and brutal green dragons along the way.
4. Combat the two green and two blue dragons engaged with Varrockian soldiers.
4.4. A checkpoint follows after defeating these four dragons. If needed, teleport out and prepare for the next wave.
5. Dispatch the black, steel, and brutal red dragons as they arrive on the ship sequentially.
5.1. When Galvek performs a casting animation, relocate to a different spot.
5.2. Another checkpoint emerges after eliminating the brutal red dragon. If required, teleport to prepare for the next set of challenges.
6. Conquer the mithril, adamant, and rune dragons as they appear on the ship one by one.
6.1. When Galvek initiates a casting animation, move away from your current position.
6.2. These dragons utilize melee, ranged, magic, and dragonfire attacks.
7. The adamant dragon has two special attacks:
7.1. A ranged attack with the Blood Forfeit effect (bypasses Protect from Missiles).
7.1. A splashing poison attack causing substantial nearby damage. Employ Antidote++ for reduced harm.
8. The rune dragon has two special attacks:
8.1. A ranged attack with the Life Leech effect (bypasses Protect from Missiles).
8.2. An electric attack striking nearby squares and arcing around you, dealing rapid damage. Use Insulated boots for decreased impact.
9. Following the rune dragon's defeat, teleport out, and equip for the final showdown.
The Final Battle - Defeating Galvek:
1. Engage Galvek in battle, with each of his four phases having 300 hitpoints.
2. Continuously dodge his ground-targeted fireballs.
2.1. Reactivate your prayers after his pink dragonfire removes them.
2.2. For optimal counter, set your quick prayers to Protect from Magic and Eagle Eye/Rigour.
3. Apply Protect from Magic during Phase 1 and Protect from Missiles during Phases 2, 3, and 4.
4. Phase 1: Galvek deploys eight fire traps. Avoid approaching them to prevent severe damage. Stand north on the ship, one square directly south of Galvek. Move two squares south to evade the fireball, then return to your initial position after avoiding the attack.
5. Phase 2: Galvek launches transparent projectiles, depleting your stats, especially run energy.
6. Phase 3: He summons waves from either the north or south end. Stand in the gap to evade them. Deactivate auto-retaliate to avoid getting pulled away from the gap.
7. Phase 4: Galvek releases earth projectiles. Evade these to prevent being bound and facing potential death.
Conquer each phase while adapting to Galvek's attacks, and emerge victorious in the final battle.
Note: This fight takes place in an instanced area. On death, you can pay Torfinn Coins 10000.png 100,000 to retrieve lost items. If you die an unsafe death, all unclaimed items will be lost.
Ending and Quest Completion:
1. Conclude your journey by returning to Alec Kincade outside the Myths' Guild.
2. Engage in a conversation with Alec Kincade to officially complete the quest. (Chat 2).
3. Congratulations, you have successfully finished the quest!
Congratulations! Quest Completed!
