

 5 MYSTERY GIFTS

![[OSRS] 1-99 Mining Guide](https://d3p9x0g8yuku7f.cloudfront.net/media/thumbnails/thumbnails/osrsmin.PNG.800x480_q90_detail_format-WEBP.png)
1-99 Mining Guide OSRS
Hello runescapers in this guide we will offer you the best methods to upload mining, the efficiency of them will depend on the time you have for each of them without anything else to say enjoy our guide.
Does VIRTGOLD offer Powerleveling Services for me?
Yes! In fact, our team of expert Powerlevelers has mastered every inch of efficient OSRS training methods, and we're ready to help you accomplish the same feat. Whether you're a seasoned adventurer or just starting out, our personalized approach ensures that you'll receive the most affordable prices and most skilled workers to come out on top. So why wait? Take on the grind of OSRS with confidence, thanks to VIRTGOLD. Want to skip the grind all together? Consider our other services such as Currency and Questing!

Quest table:

These are the quests that grant experience in the game.
Armours plus experience
-Varrock armour 1: is a reward from completing the easy Varrock Diary. The armour is received from Toby in Varrock and can be retrieved from him for free if lost.
Beneficts: *15 battlestaves from Zaff every day for 7,000 coins each.
*When worn, 10% chance of mining 2 ores at once up to gold (with some exceptions), granting experience for both ores mined. Note: when receiving the platebody, Toby says "up to coal" but he is wrong.
*When worn, 10% chance of smelting 2 bars at once up to steel when using the Edgeville furnace.
*Skull sceptre will now hold up to 14 charge.
*Individual skull sceptre parts now give 1 extra bone fragment, adding together for combined parts.

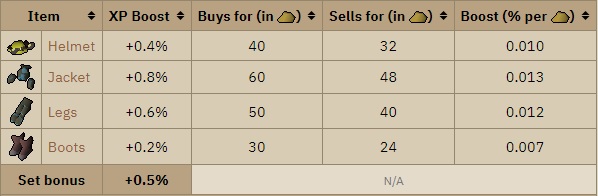
-Prospector kit: The prospector kit is an experience-boosting set, purchasable from Prospector Percy's Nugget Shop in the Motherlode Mine. Pieces of the kit are purchased using golden nuggets obtained randomly through mining pay-dirt. The set costs 180 nuggets in total, which requires mining 6,570 pay-dirt on average.

Obtaining:
Mining gloves
Members can purchase two different types of Mining Gloves from the Mining Guild Mineral Exchange store in the Mining Guild. Each pair of gloves provide a chance of the rock not depleting, which is very beneficial for players powermining or mining higher tier ores. After purchasing both pairs of gloves, the player can combine the gloves to create Expert mining gloves by talking to Belona.


Farming method:
1-15 Mining:
Start by mining copper rocks at the Varrock South-East Mine or the Lumbridge Swamp Mine.
Bank the copper ore in the nearest bank.
Once you reach level 6, start mining tin ore as well.
15-30 Mining:
Mine iron rocks in the same locations mentioned above.
Bank the iron ore.
Alternatively, you can mine iron at the Al Kharid Mine, which is closer to a furnace.
30-55 Mining:
Continue mining iron ore until level 40.
At level 40, you can switch to mining coal. The best location is the Mining Guild, where you have a higher chance of mining two coal ores at once.
Bank the coal.
55-70 Mining:
At level 55, you can start mining mithril ore.
The Mining Guild is an excellent location for mithril mining as well.
Continue banking the mithril ore.
70-85 Mining:
At level 70, you can mine adamantite ore.
The Mining Guild is still a great place for this.
Bank the adamantite ore.
85-99 Mining:
Once you reach level 85, it's time to mine runite ore.
The best location for runite mining is in the Wilderness at the resource area. However, be cautious of player killers (PKers) in this area. Ensure that you have proper equipment to defend yourself or escape.
The other location for runite mining is the Mining Guild, but it is less populated and offers fewer rocks.
Keep banking the runite ore until level 99.
Alternantive methods:
Level 1-32:
Runescapers from level 1 to 32 I recommend doing these quests to save a lot of time in farming.
-Doric quest level 1-10: this quest is free and extremely easy with a duration time of 2 min.
-The dig site level 10-32: This quest is for members is easy but takes more time approximately 30-60 min. the requirements of this quest are 10 agility, 10 herblore and 25 thieving.-
Motherload mine level 30-99
The motherload mine is a members-only Mining training area located in the Dwarven Mine, popular for offering low-intensity Mining training. Level 30 Mining is required to mine on the lower level, and level 72 Mining is required for the upper level, after it is unlocked. Neither of these requirements can be boosted. It is strongly recommended to bring a pickaxe to enter the mine and further passage, as opposed to relying on other players and miners to remove the rockfalls that block the area.
Getting here:
*The quickest way to reach the mine is to teleport outside the gate leading to the Mining Guild with a Skills necklace, which will put you just south-west of the mine entrance. 60 Mining is not required to enter with this method.
*Players can also enter the Dwarven Mine via the house in north-eastern Falador, east of the Falador Party Room. Taking the stairs will put players just north of a cave entrance to the mine.
*Players with 60 Mining can enter the Mining Guild directly and run east until they see a cave entrance.
*Finally, players can enter the Dwarven Mine via the camp south of Ice Mountain, and walk south-east to the northern entrance.
Uppper level:
For a one-time fee of 100 golden nuggets paid to Prospector Percy, players with a base level of 72 Mining can unlock the upper level. In addition to offering 64 ore veins, all clustered much closer together than the ores on the lower level, the upper level is closer to the bank and hopper. Additionally, the ore veins on the upper level are time-based and shareable with others, rather than having a flat chance of depleting: the ore vein will deplete after 15-27 seconds have elapsed from the first successfully mined pay-dirt.
Due to the ore vein timer starting after the first ore is mined, mining veins on low population worlds that are not in use by other players will provide more consistent timings and require less effort.
Water circuit:
At the centre of the mine is a water circuit that connects a hopper to a sack. Players can deposit pay-dirt into the hopper to send it to the sack for cleaning via the water circuit.
The circuit is powered by two large water wheels, which sit on struts that will occasionally break. If both struts are broken, the water flow will stop entirely, and any pay-dirt that was making its way to the sack will be frozen in place until the water flow is restored. This is not player-specific, meaning anyone can repair the struts, and nobody in the mine will be able to clean pay-dirt if they're both broken. Additionally, players can still deposit even if the struts are broken, but it will not be cleaned until one of them is repaired.
The struts can be fixed using a hammer. Doing so grants Smithing experience equal to 1.5 times the player's Smithing level, which will be rewarded on successfully fixing the strut. Chance of repairing improves with a higher level, with a base chance of 12% to repair each tick at level 1 Smithing, increasing to a 27% chance each tick at level 99.Hammers can be found in the crates surrounding the machine.

Rewards
Golden nuggets can be obtained by searching the sack after cleaning pay-dirt, with each pay-dirt having a 2.74% chance of being a nugget, regardless of a player's Mining level.[8] This means that, on average, a player should receive a golden nugget every 36.5 pay-dirts cleaned.
Golden nuggets stack, and will be collected all at once when searching the sack. Once obtained, they can be used as currency at Prospector Percy's Nugget Shop:

Experience and efficiency
The experience and profit rates of Motherlode Mine can vary greatly based on level, the tier of pickaxe used, the amount of other players mining, and whether or not the upper floor is used. The double-ore bonus from Varrock armour 2 does not apply in the Motherlode Mine.
Compared to other methods, Motherlode Mine requires significantly lower effort, while still offering moderate experience and profit. Mining iron ore or granite provides significantly higher experience rates at the cost of being more click-intensive and offering no profit, as items are dropped when mining.
Players can expect the following rates, assuming the upper level is unlocked at level 72, the best possible pick is used, and the Prospector's outfit is worn as soon as possible:

Blast mine level 75-99
The Blast Mine is located in the northern section of Lovakengj. Blast mining is a minigame which grants Mining and Firemaking experience. Participating in the minigame requires 43 Mining and 100% Lovakengj favour.
Blast mining requires dynamite, which is made by combining volcanic sulphur, juniper charcoal, saltpetre, and a pot, then adding a ball of wool to the resulting dynamite pot. Players use it to blast chunks of valuable ores from within hard rock.
Gameplay
Players must first excavate hard rock using a chisel, then use a pot of dynamite on the resulting cavity. Then, they must light the dynamite with a tinderbox and run at least three squares away from it, or take about 15 damage.
Once the dynamite explodes, players should collect the blasted ore from the ground and deposit it into an ore sack near a working operator. Players have one minute to deposit the blasted ore before it disintegrates, so it is important to be quick. When there are at least 450 of any single type of ore in the sack, it will become full and the player will need to collect it; the nearby operator will notify them of this. Players can talk to the brown-haired operator on the east side of the machine to collect the ore they mined in noted form, along with Mining experience according to the ores obtained.
Excavating the hard rock earns 20 Mining experience, and lighting the dynamite earns 50 Firemaking experience. Additional Mining experience is awarded along with the cleaned ores.
The Blast Mine is unique in that it enables players to obtain ores as if their Mining level were 10 levels higher. For example, a player with 75 Mining can obtain runite ore here. Boosts work in obtaining ores as well, but it must be active before the blasted ore appears. The experience gained per hour varies depending on Mining level and overall efficiency.
Assuming 330 dynamite used per hour, at level 70, players can expect approximately 50,000 Mining experience and 310,000 coins per hour. This scales up to 80,000 and 800,000 respectively at level 99, with the profit increasing significantly at level 75 with runite ore becoming available. In addition, Firemaking experience is gained at 16,500 per hour, which does not scale.
Including the excavation, each dynamite is worth approximately 180 experience at 75 Mining and 240 experience at 99.
Unlike level boosts, the prospector kit affects the experience received while collecting the washed ore. It is not required to wear it while blasting ore and depositing blasted ore to obtain the bonus experience.
Strategy
To do Blast Mining efficiently, it is important to:
Minimise the time wasted waiting for dynamite to explode.
Minimise the time spent running to and from the deposit sack.
Minimise the amount of damage taken.
These are much easier if a consistent strategy is used. There are multiple patterns that may be used, with little variation.
Only a chisel and tinderbox are required for the activity. A pickaxe is not used, though the special attack of a dragon pickaxe or higher as well as celestial ring slightly increase experience and profit. Graceful outfit is highly recommended, and some run energy restoration (such as stamina potions) is useful for some patterns as they slowly drain run energy.
One efficient method is using the north-west corner, depositing six blasted ore with each cycle. This leads up to 336 dynamite used per hour.
Using the image as reference:

Excavate, place and light dynamite on rock 1
Excavate, place and light dynamite on rock 2
Excavate and place dynamite on rocks 3 and 4, then light them
Excavate and place dynamite on rocks 5 and 6, then light them
Pick up blasted ores 2, 3, 4, 5, 6 and 1, deposit them in the sack by the operator, and repeat (grabbing more dynamite from the bank chest as needed)
When done correctly, no damage is taken and there is room for error without the ore disintegrating.
Additional Tips
Power mining
Also known as drop mining, this is where a player fills their inventory with ores, drops them all, and repeats. While this method of mining allows players to raise their Mining level quickly, dropping a whole inventory of ores can take some time (although this can be minimised by making use of shift-click dropping). Also, by using this method, a player would be missing out on Smithing experience. Some locations useful for drop mining:
Al Kharid mine - The scorpions can be aggressive at low combat levels.
Dwarven Mine
Bandit Camp Quarry - Players will be susceptible to damage from desert heat
Mining Guild - The ores in the members-only section respawn twice as fast, allowing for non-stop iron mining.
Use the best pickaxe available to you at each level.
Stamina potions can be useful for increasing your running time between mining spots.
Utilize a coal bag (requires 100 nuggets from the Motherlode Mine) and gem bag (requires 100 uncut gems from the Motherlode Mine) to store more resources.
Remember, mining can be a slow skill to train, so it's important to stay patient and persistent. Good luck on your journey to level 99 Mining in Old School RuneScape!
![[OSRS] 1-99 Magic Guide](https://d3p9x0g8yuku7f.cloudfront.net/media/thumbnails/thumbnails/osrsmag.PNG.350x216_q90_detail_format-WEBP.png)
![[Diablo 4] Necromancer Build Guide](https://d3p9x0g8yuku7f.cloudfront.net/media/thumbnails/thumbnails/d4nec.PNG.350x216_q90_detail_format-WEBP.png)
![[Diablo 4] Sorcerer Build Guide](https://d3p9x0g8yuku7f.cloudfront.net/media/thumbnails/thumbnails/d4sorc.PNG.350x216_q90_detail_format-WEBP.png)
![[OSRS] 1-99 Woodcutting Guide](https://d3p9x0g8yuku7f.cloudfront.net/media/thumbnails/thumbnails/1-99wc.PNG.350x216_q90_detail_format-WEBP.png)
![[OSRS] Saradomin God Wars Dungeon Guide](https://d3p9x0g8yuku7f.cloudfront.net/media/thumbnails/thumbnails/sgwd.PNG.350x216_q90_detail_format-WEBP.png)
![[Diablo 4] Season of the Malignant Update](https://d3p9x0g8yuku7f.cloudfront.net/media/thumbnails/thumbnails/diablo4up.PNG.350x216_q90_detail_format-WEBP.png)