5 MYSTERY GIFTS

Temple of Aminishi (ED1) RS3 Guide 2023
The Temple of Aminishi, also known as the Temple of Seiryu, is an Elite Dungeon in the popular MMORPG RuneScape (RS3). It offers a challenging 1-3 player combat and narrative experience with unique rewards. To access the Temple of Aminishi, players must first complete the quest "Impressing the Locals".
The storyline revolves around the investigation of the Acolytes of Seiryu and the mysterious behavior of the Council of Seven, as the legendary Azure Serpent, Seiryu, has not been seen for centuries. Players receive a task from Bryll Thoksdottir to delve into the temple and uncover the truth.
The dungeon is designed for teams of 2-3 players, and the grouping system is essential for forming a team. Inside the Temple of Aminishi, players face three challenging bosses: The Sanctum Guardian, Masuta the Ascended, and the mighty Seiryu the Azure Serpent.
The rewards from completing the dungeon are valuable and include Masuta's warspear, a powerful level 82 two-handed melee weapon. Players can also obtain the "fishy treat," ancient scales, and onyx dust as rewards. Ancient scales are particularly important as they can be used to upgrade Sirenic equipment to tier 92, making them highly sought-after items.
Additionally, Kuroryu, the boss pet of Seiryu, can be obtained as a rare drop for players who are lucky enough to defeat the formidable Azure Serpent.
The Temple of Aminishi provides an engaging and challenging experience for players seeking unique loot and Dungeoneering experience and tokens in the world of RuneScape
Getting there
To access the Temple of Aminishi in RuneScape, players have several options:
1. Complete the quest "Impressing the Locals" to unlock access to the Arc, which includes the island of Aminishi.
2. Teleport to Port Sarim and talk to Mister Gully, who will take you to the island of Aminishi.
3. Use the Arc Journal to teleport directly to the island of Aminishi. Once there, run to the main gate of the Temple of Aminishi to enter.
4. If you have access to War's Retreat, use the boss portal located there to teleport directly to the Temple of Aminishi.
5. If you have achieved level 99 in all skills, you can use the boss portal in the Max Guild to teleport directly to the Temple of Aminishi.
6. Use the Ring of Kinship to teleport to Daemonheim and then run east to the treasure chest. Interact with the chest and select the option to teleport to the Temple of Aminishi.
If you have unlocked the ability to teleport to any Elite Dungeon entrance, you can use the teleport option on the treasure chest outside The Shadow Reef, the Dragonkin Laboratory, or The Zamorakian Undercity to get to the Temple of Aminishi.
Levels and equipment


It is true that Melee is considered the most challenging combat style for tackling the Temple of Aminishi dungeon in RuneScape, and it is generally not recommended for beginners. However, it has its advantages, such as being able to output tremendously high damage, which can be very useful against the dungeon's main bosses. Players using Melee should be aware that they will take more damage compared to other combat styles.
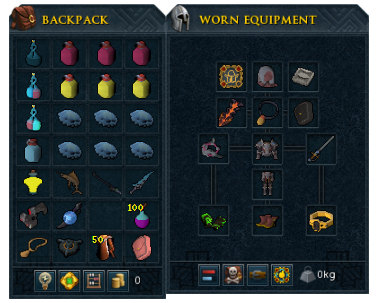
For solo runs, it is recommended to use at least Masterwork equipment or Malevolent armor due to the damage taken. In a group setting, Bandos equipment can be sufficient. Here are some items and equipment that can be helpful for players using Melee in the dungeon:
1. Armor: Masterwork or Malevolent armor for solo, Bandos armor for group play.
2. Weapons: A Noxious Scythe is particularly useful for its area-of-effect (AoE) abilities.
3. Auras: Berserker aura can increase damage output, but it may also increase the damage taken, so use with caution.
4. Pocket Slot: Scrimshaw of Vampyrism provides healing based on your damage dealt.
5. Neck Slot: Amulet of Souls for its Soul Split effect, which can help with healing.
6. Gloves: Cinderbane gloves are best-in-slot for their poison effect, providing extra damage over time.
7. Boots: Laceration boots for their damage bonus.
8. Ring: Ring of Death for the chance to save items upon death and provide additional damage.
9. Potions: Elder Overload potions, Super Restores, Super Prayer Renewal potions, and Saradomin Brews for healing and boosting combat stats.
10. Enhanced Excalibur with the Mobile perk can be used for Bladed Dive and Surge abilities to move around quickly.
11. Dominion Mines can provide free damage on various high health monsters.
It's important to bring Saradomin Brew flasks and Blue Blubber Jellyfish for healing, as Melee players will likely need more food compared to other combat styles. Players should also consider bringing a shield or defender for abilities like Resonance and Reflect to help mitigate incoming damage.
If players have access to Disruption Shield and Vengeance, they can further enhance their defensive and offensive capabilities in the dungeon.
Magic is indeed a versatile and popular choice for approaching PvM (Player vs. Monster) content, including the Temple of Aminishi in RuneScape. The use of Vulnerability spells can be highly effective due to the high health of most monsters in the dungeon. Having at least one mage in a group can be helpful for applying Vulnerability, but other styles like Ranged and Melee can deal more damage once the debuff is active if you don't use 4 tick auto-attacks.
Here are some items and equipment that can be helpful for players using Magic in the Temple of Aminishi:
1. Armor: Ganodermic or Seasinger magic tank armor is recommended for its defensive bonuses.
2. Weapons: The Wand of the Cywir elders and the Guthix Staff can be useful for their special effects and damage output.
3. Amulet: Amulet of Souls is beneficial for its Soul Split effect to aid in healing.
4. Grasping Rune Pouch: Prepared with the required runes for useful abilities like Exsanguinate, Incite Fear, Animate Dead, and Spellbook Swap for Disruption Shield.
5. Gloves: Cinderbane gloves are best-in-slot for their poison effect, adding extra damage over time.
6. Boots: Blast Diffusion boots can be helpful for their damage reduction effect.
7. Ring: Ring of Death can save items upon death and provide additional damage.
8. Potions: Elder Overload potions, Super Restores, Adrenaline Renewal potions, Saradomin Brews, Weapon Poison+++ flasks, and Powerburst of Acceleration are essential for healing and boosting combat stats.
9. Inventory: Saradomin Brew flasks and Sailfish can be adjusted according to the player's healing needs.
10. Pocket Slot: An Enhanced Excalibur and any mainhand Melee weapon can be carried for Bladed Dive ability and versatility.
11. Shield: Any shield or defender can be used for abilities like Resonance and Reflect to mitigate damage.

Overview
The Temple of Aminishi is a vast underground complex in RuneScape, and it serves as the dwelling place of Seiryu, the Azure Serpent. The temple consists of five sections, and players must defeat the monsters guarding the barriers in each section to progress further.
Throughout the temple, players will find three chests located in the second, fourth, and final sections. These chests serve as quick teleports and can collect loot if desired. Players have the option to disable the auto-loot feature, which grants a 20% chance of doubled drops. However, it's generally not recommended to pick up drops during the dungeon due to the fast-paced and large-scale fighting, as it may waste valuable inventory space for boss fights. Most enemies in the temple will drop items, with the exception of waterfiends, which only drop water runes, and defense pylons.
To proceed through the temple, players must deal with barriers that block their path. These barriers are linked to several enemies, and once all linked enemies are defeated, the barrier dissipates. Non-linked enemies will despawn on further visits after the barrier is gone.
Certain enemies in the temple utilize adrenaline, and they are affected by abilities like Siphon and Natural Instinct as if it were a player-versus-player situation.
Unlike the following dungeons, the Dragonkin Laboratory and Shadow Reef, the Temple of Aminishi has numerous winding paths, and most of them lead to off-path areas. In contrast, the other two dungeons have a more straightforward, linear path with shorter deviations. Additionally, the Temple of Aminishi has fewer critical enemies that need to be defeated to progress through the dungeon.
As players traverse the Temple of Aminishi, they will face various challenges and must work together to overcome the enemies and uncover the secrets of the temple before facing the fearsome Seiryu, the Azure Serpent.

Bosses(Strategies)
Sanctum Guardian

The Sanctum Guardian is the first boss encountered in the Temple of Aminishi, with a total of 450,000 health. It is essential to note that using Melee without adequate experience is strongly advised against, as the boss possesses mechanics that can severely hinder the fight if not handled properly. To engage in the battle, players can utilize vulnerability bombs to apply the Vulnerability debuff.
The boss has a specific attack rotation, which consists of the following:
1. Four auto-attacks
2. Splishy Splash
3. One auto-attack
4. Water Spit
5. One auto-attack
6. Black Stone Flames
7. One auto-attack
8. Repeats from Splishy Splash
Mechanic 1: Melee & Ranged Auto-attacks The Sanctum Guardian employs both melee and ranged attacks. Her melee attack is a single swipe, which she occasionally uses when no players are within range after using her purple flames attack. Her primary attack involves launching unguided purple projectiles at the target's location, similar to Vorago's blue and red bomb attacks. These projectiles have a 3x3 area-of-effect (AoE) and can deal up to 3,000 damage.
The Sanctum Guardian focuses only on one player and will not change aggression unless that player dies or another player uses the Provoke ability on her.
Mechanic 2: Splishy Splash Periodically, the Sanctum Guardian will dive down into her pool and then rise back up to splash a large amount of water towards nearby targets. This attack can deal up to 5,000 melee damage and has an attack range of 7. However, its reach is longer when players stand east or south of her. To mitigate this damage, players can use Deflect Melee or Resonance.
Mechanic 3: Water Spit Following the Splishy Splash attack, the Sanctum Guardian will face north and release a torrent of water from her mouth. She will then spin around anti-clockwise in a 360-degree pattern. Players caught in this water blast will take 5,000-7,000 soft typeless damage. Precise timing of Surge, Dive, Bladed Dive, or Escape abilities can help players avoid this attack. A recommended strategy is to stand towards the north-east of the Sanctum Guardian before she starts spitting water, then move towards the north-west before she finishes spinning. Players should use healing and defensive abilities as necessary to withstand the soft typeless damage.
Mechanic 4: Black Stone Flames After the torrent attack, the Sanctum Guardian will select a player and infect them with shadowy energy, causing a bar to appear over them. When the bar empties, shadow flames will appear in a 5x5 area, dealing rapid, gradually increasing hard typeless damage. Players must avoid these spots at all costs, as the damage starts at 500-700 but rapidly ramps up to 5,500. Accidentally running into a shadow flame can quickly kill players.
For melee fighters, extra care is needed to place the shadow flames away from the Sanctum Guardian to preserve space for attacking. Recommended placement is on the north side of the arena near the wall. Alternatively, if no one is using melee, the shadow flames can be placed on the inner corners of the Sanctum Guardian's pool. Abilities like Dive or Bladed Dive can be helpful to ensure the shadow flames are placed in the desired location in time.
Mechanic 5: Summon Reinforcements The Sanctum Guardian has the ability to summon two Crassian reinforcements to aid her in battle. These reinforcements are summoned every three Water Spit attacks, and each has 10,000 health. They primarily use weak ranged attacks.
Masuta the Ascended

Masuta the Ascended is the final boss encountered in the Temple of Aminishi, boasting a total of 550,000 health. He utilizes all three forms of the combat triangle and has three distinct phases in the battle. During group encounters, Masuta is likely to focus on the player with the lowest armor value, regardless of aggression modifications.
Masuta's attack pattern consists of the following sequence:
1. 2-4 auto-attacks
2. Persistant Hurricane
3. 3-5 auto-attacks
4. Greater Shadow Tsunami
5. 3-5 auto-attacks
6. Repeats from Hurricane
Phase 1
Start: In this initial phase, Masuta can use both shadow clones and Pulverise at any time, which are not integrated into his regular attack pattern. He will use several auto-attacks, followed by the Hurricane attack. Afterward, he follows up with the Shadow Tsunami. Masuta summons clones shortly before executing the Shadow Tsunami attack, and players can use this opportunity to evade the ensuing tsunami. This pattern continues until he reaches around 50% of his health. If Masuta performs an ability when his health falls below this amount, Phase 2 will begin.
Mechanic 1: Long Ranged Basic Attacks: Masuta attacks using long-ranged melee, occasionally incorporating ranged attacks. He has several abilities at his disposal.
Mechanic 2: Black Stone Clone Jutsu: Masuta summons a shadow clone (two in group encounters) that roundhouse kicks all players in range, dealing high melee damage. As the clone is treated as a separate monster, Debilitate has no effect on it. Masuta also performs an auto-attack at the same time he creates the clones, meaning nearby players can be hit up to three times if clones are summoned. The damage from the clone is significantly increased if players are more than 10 spaces away from Masuta.
Mechanic 3: Persistent Hurricane: Masuta executes Hurricane ten times, with a range of 3 spaces, dealing gradually increasing melee damage with each revolution. He can move at a walking speed while doing this and tracks the target at the start of the ability, ignoring Provoke and similar effects. Masuta is immune to damage while performing this attack and clears any bleeds applied before spinning. Players can minimize damage by using Deflect Melee while under the effects of Devotion to tank most of the hits and then moving out of Masuta's range before Devotion runs out. Alternatively, players can kite Masuta until the attack ends.
Mechanic 4: Greater Shadow Tsunami: Masuta conjures shadow energy around him, which crashes into the ground, dealing 6000 magic damage on the targeted tile. He will then perform Tsunami with this energy, damaging anyone in front of him with heavy magic damage. Along with auto-attacks, Masuta will summon clones to allow players to gain distance from him before he crashes down. Players can use Deflect Magic to reduce the damage or move out of Masuta's attack range.
Mechanic 5: Pulverise: Masuta targets a player, yells "I'll pulverize you!" and then casts Pulverise, dealing heavy melee damage in a cone AoE in the direction he is facing. There is a one-second delay after the text appears to dodge the attack; moving too late will result in the player being hit regardless.
Phase 2
Levitation: In this phase, Masuta levitates above the ground and gains a massive defense and damage reduction buff, ceasing his attacks on players. Instead, he continuously summons thrashing waters. Each thrashing water has 8,000 health, uses rapid magic attacks, and is immune to stuns, reflects, and poison. Players should use Deflect Magic to reduce damage taken. Devotion can further reduce damage, with its effect being prolonged for up to 20 seconds after killing two thrashing waters. In more extreme cases, Reflect may also be used to reduce damage, though it should not be relied upon to kill the waters.
The thrashing waters can appear anywhere inside the arena and have a long attack range. When a thrashing water is destroyed, any player within 3 spaces of it will receive a Calm Waters buff, which reduces Masuta's magic attack damage in the next phase.
Phase 3
Final: In this final phase, Masuta stops using melee and switches to rapid Ranged attacks. The speed of the ranged attack registers based on how far players are from Masuta, with the fastest speed occurring when one space away from him. He may occasionally move closer to his target during this phase. Players should use Deflect Missiles to reduce damage.
Mechanic 2: Black Stone Strike: Two attacks after the start of the final phase, Masuta performs a Meteor Strike-like animation, creating a large wave of shadow that deals up to 8,000 magic damage to all players. After the initial magic attack, he will use it again after every 3-6 ranged attacks. Players should prepare for the attack after every 3 ranged attacks, as the magic attack will occur soon afterward.
Players can reduce the damage inflicted by this magic attack with the Calm Waters buff obtained during the previous phase. The attack is treated as a simple magic attack and can miss with sufficient armor rating or be reduced by most damage-reducing effects such as Deflect Magic, Reflect, or Debilitate. Players can also heal off of the damage with Resonance. If using Deflect Magic, players should switch back to Deflect Missiles after the attack.
Note: If a player is signed or is revived by Immortality, all Calm Waters stacks will be removed.
Upon defeating Masuta, a hidden staircase will reveal itself. His loot will appear just in front of the hidden staircase, regardless of where he is killed. If players are standing around the top section when Masuta dies, they will be automatically placed back on the lower platform. Players can proceed to the next area via the stairs and return to the throne room to collect their loot if this happens.
Seiryu the Azure Serpent

Seiryu is the final boss encountered in the Temple of Aminishi, boasting a total of 7,500,000 health. Unlike other final elite dungeon bosses, Seiryu and the black crystals that need to be destroyed are immune to poison damage. Thus, players using cinderbane gloves should switch to more powerful gloves for the fight.
Mechanic 1: Shadowfire Gaze: Seiryu employs magic attacks against players by spitting out a large amount of shadow energy in the middle, which then bounces to all players in the arena, dealing up to 3,000 damage.
Mechanic 2: Deep Breath: During the fight, Seiryu will take a deep breath, indicated by the game message: "Seiryu takes a huge breath." He will then breathe a massive amount of shadow flame on all players in the arena, dealing up to 8,000 damage. The attack is treated as a basic magic attack and has a chance of missing, though such instances are rare even with very high armor rating. It is highly recommended to use Resonance to heal up from the damage and save food for emergencies. If Resonance is on cooldown, players can use Deflect Magic in combination with defensive abilities such as Devotion, Debilitate, or Reflect to mitigate the damage. Standing a maximum of 3 spaces north from the southern edge of the platform will negate any damage from this attack but may reduce DPS slightly.
Mechanic 3: Black Stone Tendrils: During the fight, Seiryu lowers his tail into the shadow, causing up to three shadows to appear under players, one at a time. Players must move out of the way as these shadows deal damage starting from 1,800 damage, gradually increasing. The shadows have erratic AoE; when a shadow pool forms around the targeted area, it possesses a 3x3 AoE, but when the pool disappears and only leaves the tendrils, it possesses a 1x1 AoE.
Mechanic 4: Grasping Hands: After the first deep breath attack, Seiryu performs a "shadow root" attack. A flashing arrow appears over the targeted tile, while a temporary compass indicating its direction appears under players. Shadow energy then flows to that tile, and shadow hands will rush towards all players' positions at the same time. Standing under the targeted tile ensures no hands will spawn for that player. It is essential to avoid these attacks, as they have a 1x1 AoE and can deal up to 4,500 damage per tick, potentially resulting in a quick death.
As the fight progresses, arrows of shadow hands will appear from Seiryu in different locations, such as far west and east, and mid-west/east. Even melee players can safely attack Seiryu if a shadow root emerges from the middle of the arena.
Seiryu continues to follow his attack pattern, and at times, he will use both the root and arrow hand attacks, requiring players to quickly adapt to avoid death. Players may use Resonance even if it was used on the deep breath attack prior to this pattern.
Mechanic 5 & 6: Black Stone Crystals and Shadow Enigmas: When Seiryu loses 300,000 health, he collapses and becomes unattackable. Players must destroy the black crystals on his collar, with each crystal having health equal to 100,000 + 50,000 for each player in the group. Once the crystals are destroyed, players can jump on Seiryu's collar, which becomes available after he is knocked out. Approximately 30 seconds after being knocked out, a black hand will appear from the platform, generating a shadow pool around it, dealing damage to nearby players. The hand then retracts into the pool and spawns a varying number of shadow enigmas, depending on the number of players on the collar and platform. These enigmas have 4,500 health and use moderately weak melee attacks if provoked. If they reach Seiryu, they will turn into energy, healing the crystals for 50,000 health each roughly 5 seconds after turning into energy.
Players must be cautious while climbing the shackles to avoid damage from the shadow hands. Dominion mines are highly recommended for this section, as they deal 20,000 damage for every pair placed. Players have roughly a minute before Seiryu wakes up and tosses them back onto the platform. Freedom should be used to break free of the stun/bind and finish off any remaining enigmas before focusing on Seiryu.
The crystals should be destroyed within 2-3 rotations, even when soloing. Once all three crystals are destroyed, Seiryu is freed, and the encounter ends.
Rewards